Common types of tyre damage
Tyre damage comes in several forms and levels of severity. Regardless of how safe a driver you are, the chances are your tyres will incur damage at some point in their lifespan. Whether it’s caused by debris on the road, potholes, or a road traffic incident, you should be prepared to identify and analyse the varied types of tyre damage.
Bulges, lumps and cuts
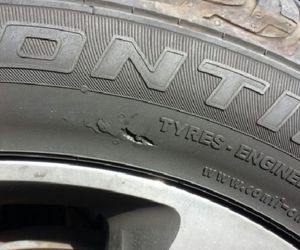
Bulges in tyres can occur when the sidewall becomes damaged, often caused by ‘kerbing’ or potholes in the road.
The structural integrity of the tyre sidewall is weakened, and the internal air pressure creates a visible bulge. A lump or a bulge typically indicates the tyre has been damaged internally.
If you notice a cut, lump, or bulge, you need to get the tyre replaced or repaired immediately. Likewise, you should have the tyre checked immediately if you spot any rips, cuts, and tears due to 'kerbing’ or pothole damage.
Any cut deep enough to reach internal structure renders tyres unsafe and in need of replacement.
Camber wear
Look out for: The tyre's outside edge or inside edge will show significantly more wear than the rest of the tyre if your tyre is suffering from camber wear. You will typically see a gradual slope from one side of the tyre to the other, and it's usually easy to identify.
Possible causes: Camber wear can be caused by a bent strut, suspension misalignment, a weak or broken spring, a dislocated strut tower, a bent spindle or a collapsed or damaged control arm brushing.
What to do: The causes of tyre camber wear can be pretty severe and affect the safety and performance of your car. It is crucial to get your vehicle checked at an approved garage to determine the cause of the problem by checking the suspension and its alignment.
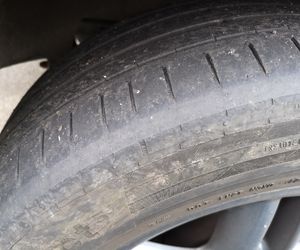
Centre Tread Wear
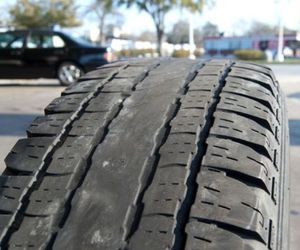
Look out for: Extreme wear down the centre of the tyre with less wear visible on the outer tyre edges.
Possible causes: Centre tyre wear is typically caused by the overinflation of tyres. This causes a bulge in the centre of the tyre, which causes the centre to take more pressure and thus wear more quickly than the outer tyre edges.
What to do: Always check your tyre pressures regularly. If you do have to inflate your tyres, keep them within your manufacturers recommended tyre pressure guidelines which you can find in your manual.
Cupping Tyre Wear
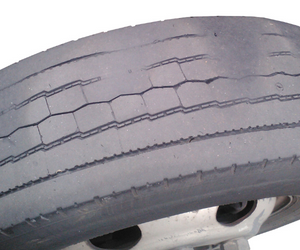
Look out for: With cupping tyre wear, you should look out for cups or dips around the edge of the tyre tread. Cupping wear does not follow a distinct pattern, so you must examine the entire tyre for signs of cups or dips.
Possible causes: Cupping tyre wear can be caused by one of the tyres being out of balance with the others. However, it could also be due to impaired struts or shock absorbers.
What to do: Cupping can indicate an issue that could soon become pretty serious if left untreated, which is why you should take your vehicle to an approved garage to get your tyres checked. A technician should be able to advise whether your tyres need re-balancing or if you have weakened struts or shock absorbers, in which case these may need replacing.
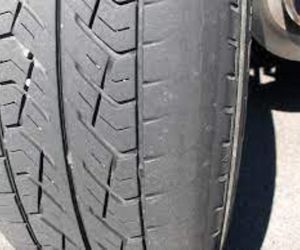
Outer Tyre Wear
Look out for: The outer edge of the tyre will wear more rapidly than the centre of the tyre.
Possible causes: Outside tyre wear is typically caused by underinflated tyres which causes a dip to occur in the centre of the tyre. This dip has less contact with the road, so it does not wear as quickly while putting more of the car's weight on the outer edge of the tyre, causing more wear.
What to do: You should make sure you inspect your tyre pressures regularly and always pump the tyre up to the manufacturers recommended tyre pressure. If you are not confident checking the tyre pressures on your vehicle, try to find a local garage that offers a free check.
You may also find your tyres susceptible to patchy wear, i.e., random wear of the tyre with no clear pattern. This can indicate a tyre is out of balance, so you should take your vehicle to a garage to get your tyres balanced.
What tyre brands am I allowed to use during my lease?
If you need to replace the tyres on your lease car or van during your contract, please ensure you use a premium brand like Michelin, Pirelli, Goodyear, Bridgestone, Dunlop or Continental.
Spare Tyres
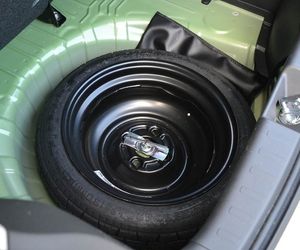
Nowadays, it is much less common to be provided with a full-sized spare that functions as adequately as your main tyres. For weight and space reasons, you may have a mini spare (also known as a ‘space saver’), which is sufficient enough to get you home but inappropriate for continued use. Space saver tyres are also not designed to be driven above 50mph.
Flat Tyres
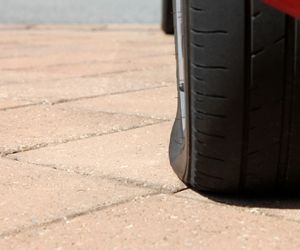
Many drivers have experienced getting a flat tyre at some point during their driving history. However, sensible driving decisions and good maintenance practices should decrease the risk of punctures and blowouts.
- Check your tyres for uneven wear and good tread once a week and after any notable knocks
- Check your air pressure at least once a month (see below for more information)
- Avoid roads with recent construction activity and rough surfaces
- Try and spot obvious puncture hazards while driving, but don’t take evasive action unless it's safe to do so
Don't overload the vehicle
It is vital not to overload your vehicle and the weight of your tyres carrying capacity. Abnormal flexing under heavy loads causes damage to tyres, and the edges of the tread can build up extreme heat and possibly start separating from the tyre. Cords in the sidewalls can begin to snap, and once this starts, it could continue, even after the load is removed.
An overloaded vehicle is hard to handle, especially in emergencies calling for quick manoeuvring. And the car's springs and shock absorbers may be strained to the point of actual damage.
Consistently using tyres on the top of their weight limit degrades tyres the same as overloading them for a short time. If a tyre has already been underinflated or damaged, even a tiny extra load can lead to a blowout.
So it’s important to adjust your tyre pressure depending on the weight you have added.
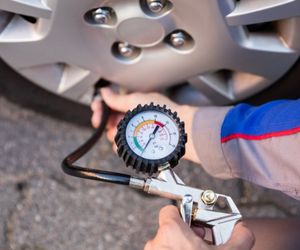
Checking tyre air pressure
Underinflated tyres are a blowout risk because of the increased heat and friction they encounter.
Overinflated tyres are more liable to pick up damage from potholes and bumpy roads. Checking your tyre pressure at least once a month will help prevent either situation.
- The ideal PSI (pounds per square inch) should be listed in your vehicle owner’s manual, or on a sticker on the driver side door panel or the inside of your fuel flap
- If you are carrying a heavy load, the ideal PSI will increase – check the owner’s manual for more information
- Use a high-quality air-pressure gauge to measure your current PSI or visit a petrol station if you don’t own one
- Ideally, check the tyre pressures after your vehicle has been resting for at least three hours. This is because tyre pressure readings can be thrown off by hot air in the tyres
- Increase measurement accuracy by having a tight seal between your gauge and the valve – if you hear a hiss, you’re probably not getting an accurate reading, so adjust the gauge